Thursday, November 04, 2010

Wednesday, November 03, 2010
Tuesday, November 02, 2010
Monday, November 01, 2010
Wednesday, October 13, 2010
keep on paddling (updated)
The photopolymer graveur process has become frustrating. I don't know whether I've become more demanding, with a more finely tuned eye for detail, or I'm just hitting some sort of sophomore jinx with a new process. Perhaps some things are not working right this week. I'm encouraged by some of things I've learned while making mistakes, but frustrated that the final result is not right. The photopolymer graveur process is still new to me, but screen printing is not. I've made three attempts at one image with a screen today, with poor results.
I have three options.
1. Should I give up completely?
2. Should I take a long break and come back to the problems later?
3. Should I keep pushing forward, finding a way to turn anger and frustration into determintation?
I am a fan of option #3. It is one that I naturally follow, and a belief that my experience on whitewater (and other outdoor activities) has reinforced. The river will not stop moving. I will make mistakes along the way, but I need to forget them immediately after they happen and keep moving forward.

I'm inspired by some of the students in my studio classes. Their frustrated learning curve is palpable, particularly when I hear them let out a big sigh, drop their shoulders, and look away from their drawing. What has encouraged me so much, lately, is the frequency with which the return to their work, trusting the process of looking/drawing/looking/drawing/etc. Their faith in the process, and belief that they will make progress, moves me forward in my own work, and give me faith that I, too, will make progress.
Beginners mind...
_______________________________________________________________________
update (Oct. 15)
made some progress with the photo gravure

solved the contact problem, mostly...
I admit that I was not as clean as I should have been, so the three pieces of dust tented the transparency enough to lighten up the right side, BUT everything else is looking pretty good, so at least the work flow is good now.
downside is that I still can't make a screen for anything....
I've done so many of these that I can't figure out what I am doing wrong.
It will wait for the weekend. I need a break for now.
_________________________________________________________________________
update #3:
I have not liked the overall image, and did not trust how much information would be lost with the gravure process, so I decided to do alot of burning and dodging in photoshop. This was all done while clicking the preview filter on and off to predict results.
After a while I decided, since nothing was working perfectly and this was becoming an experimental piece anyway, to push the burn and dodge to extremes, betting on anything above 80% and below 20% blowing out to pure black or white.

My guesses were about half correct. I pushed it a bit too far, and the image is awkward. But, the extreme example is a good way to learn, and I will keep this one for future reference.
________________________________________________________________________
update #4:
This is a good image. Adjustments in Photoshop improved the image. I am learning how the preview curve actually relates to the final product. The transparency/positive was good. The only problem with this plate was a lack of good contact in the lower right corner. I'll clean the glass on the exposure unit and the print frame before plate #5.

_________________________________________________________________________
update #5:
This is the final image.
Contact with the frame was good.
I dried the transparency with a hair dryer to make sure it did not contain any moisture.
I had taken the advice of a friend and sprayed the back of my positive/transparency with matte medium to eliminate Newton's Rings. The same person discovered why baby powder was useful in this process. Brush it on the plate, then brush it off. The super thin residual film of talc will create just enough space for gas and water vapor to escape during exposure. Talc is fine enough to not act like dust and create exposure issues. I imagine that using baby powder would make my results even more predictable.

I will edition this plate.
The next step is to figure out which tone paper, and what color ink I will use for the edition.
_________________________________________________________________________
Here are the plates in order, for easier comparison.
http://artandwater.blogspot.com/2010/06/photopolymer-graveur-curves-preview-in.html
http://artandwater.blogspot.com/2010/04/solarplate-etching.html
http://artandwater.blogspot.com/2010/04/photo-polymer-gravure.html
http://artandwater.blogspot.com/2010/05/plate-decisions-and-editioning.html
http://artandwater.blogspot.com/2010/05/photopolymer-aquatint-grayscale-test.html
http://artandwater.blogspot.com/2010/05/variety-in-three-editions.html
http://artandwater.blogspot.com/2010/05/better-look.html
I have three options.
1. Should I give up completely?
2. Should I take a long break and come back to the problems later?
3. Should I keep pushing forward, finding a way to turn anger and frustration into determintation?
I am a fan of option #3. It is one that I naturally follow, and a belief that my experience on whitewater (and other outdoor activities) has reinforced. The river will not stop moving. I will make mistakes along the way, but I need to forget them immediately after they happen and keep moving forward.

I'm inspired by some of the students in my studio classes. Their frustrated learning curve is palpable, particularly when I hear them let out a big sigh, drop their shoulders, and look away from their drawing. What has encouraged me so much, lately, is the frequency with which the return to their work, trusting the process of looking/drawing/looking/drawing/etc. Their faith in the process, and belief that they will make progress, moves me forward in my own work, and give me faith that I, too, will make progress.
Beginners mind...
_______________________________________________________________________
update (Oct. 15)
made some progress with the photo gravure

solved the contact problem, mostly...
I admit that I was not as clean as I should have been, so the three pieces of dust tented the transparency enough to lighten up the right side, BUT everything else is looking pretty good, so at least the work flow is good now.
downside is that I still can't make a screen for anything....
I've done so many of these that I can't figure out what I am doing wrong.
It will wait for the weekend. I need a break for now.
_________________________________________________________________________
update #3:
I have not liked the overall image, and did not trust how much information would be lost with the gravure process, so I decided to do alot of burning and dodging in photoshop. This was all done while clicking the preview filter on and off to predict results.
After a while I decided, since nothing was working perfectly and this was becoming an experimental piece anyway, to push the burn and dodge to extremes, betting on anything above 80% and below 20% blowing out to pure black or white.

My guesses were about half correct. I pushed it a bit too far, and the image is awkward. But, the extreme example is a good way to learn, and I will keep this one for future reference.
________________________________________________________________________
update #4:
This is a good image. Adjustments in Photoshop improved the image. I am learning how the preview curve actually relates to the final product. The transparency/positive was good. The only problem with this plate was a lack of good contact in the lower right corner. I'll clean the glass on the exposure unit and the print frame before plate #5.

_________________________________________________________________________
update #5:
This is the final image.
Contact with the frame was good.
I dried the transparency with a hair dryer to make sure it did not contain any moisture.
I had taken the advice of a friend and sprayed the back of my positive/transparency with matte medium to eliminate Newton's Rings. The same person discovered why baby powder was useful in this process. Brush it on the plate, then brush it off. The super thin residual film of talc will create just enough space for gas and water vapor to escape during exposure. Talc is fine enough to not act like dust and create exposure issues. I imagine that using baby powder would make my results even more predictable.

I will edition this plate.
The next step is to figure out which tone paper, and what color ink I will use for the edition.
_________________________________________________________________________
Here are the plates in order, for easier comparison.
http://artandwater.blogspot.com/2010/06/photopolymer-graveur-curves-preview-in.html
http://artandwater.blogspot.com/2010/04/solarplate-etching.html
http://artandwater.blogspot.com/2010/04/photo-polymer-gravure.html
http://artandwater.blogspot.com/2010/05/plate-decisions-and-editioning.html
http://artandwater.blogspot.com/2010/05/photopolymer-aquatint-grayscale-test.html
http://artandwater.blogspot.com/2010/05/variety-in-three-editions.html
http://artandwater.blogspot.com/2010/05/better-look.html
Monday, September 27, 2010
Life Drawing blog
I just started this new blog for the sake of art students enrolled in my Life Drawing class at Fairleigh Dickinson University. It acts as a supplement to the class work. Feel free to comment on it. I am particularly interested in the comments from current students as well as fellow artists.

This is an example of two 30 second gesture drawings done on top of each other.
The challenge is to keep proportion in mind, but work fast, without pausing to measure. It is an excersize to loosen up your hand and eye in the beginning of class. It will also train you to see the bigger picture and not be distracted by details of a figure (which can be added in much later if you wish).

This is an example of two 30 second gesture drawings done on top of each other.
The challenge is to keep proportion in mind, but work fast, without pausing to measure. It is an excersize to loosen up your hand and eye in the beginning of class. It will also train you to see the bigger picture and not be distracted by details of a figure (which can be added in much later if you wish).
Sunday, September 26, 2010
General Drawing blog
I just started this new blog for the sake of art students enrolled in my General Drawing class at Fairleigh Dickinson University. It acts as a supplement to the class work. Feel free to comment on it. I am particularly interested in the comments from current students as well as fellow artists.
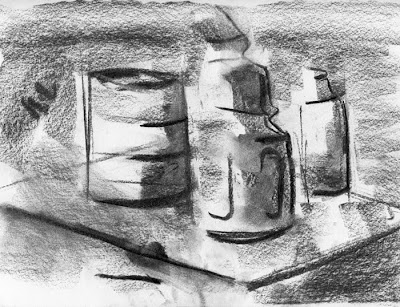
This 60 second drawing is an example of how you want to address the entire page at the start.
You can use a light touch to feel your way around the page and dictate how you want to crop what you see in front of you, turning into a picture on a page.
Quickly define where the shadows will be. You can fine tune later with an eraser and a pencil/charcoal to make the light areas lighter (eraser) and the dark areas darker (pencil/charcoal).

This 60 second drawing is an example of how you want to address the entire page at the start.
You can use a light touch to feel your way around the page and dictate how you want to crop what you see in front of you, turning into a picture on a page.
Quickly define where the shadows will be. You can fine tune later with an eraser and a pencil/charcoal to make the light areas lighter (eraser) and the dark areas darker (pencil/charcoal).
Thursday, August 19, 2010
www.jpg)
Wednesday, August 11, 2010

Thursday, August 05, 2010
Deerfield Fest
thank you to everyone who stopped by the booth
(and special thank you to those who bought art)

thanks to Casey for the photo
(and special thank you to those who bought art)

thanks to Casey for the photo
Subscribe to:
Posts (Atom)